Thursday, December 1, 2011

Rockin' Surfboard Night Light

So I wanted to get a night light for my little boy's room and I just didn't like anything I was seeing at the store. Last Christmas I went to a neighborhood block party where one of the homes staked liquor bottles full of lights along the sidewalk pathway. Very cool...and hey - recycling! See?....


And it made me think how cute a bottle of lights of would be as a night light. So I soaked and scraped the label off a vodka bottle and went in search of a wine rocker. There are a ton out there but the one I really liked was a curvy one I found on Etsy. Slap on a little paint, some embossed and foiled stickers, and a little triple thick gloss to seal the paint and stickers. Add a dimmer to your lights so you can use just the right amount of glow in your little one's room. (I was gonna glue a few wood circles to the rocker and make this night light a skateboard, but daddy's a surfer and pushed for a surfboard. LOL. But the skateboard was gonna be totally cute!!!)

Wednesday, August 3, 2011

Scrapbooking & Wooden Letters


Okay, so I didn't actually put these together myself, but they were cute, so I though I'd share them with you. These were a gift for my little man from my sister-in-law, who was helped by her friend Stacy. (Check out the facebook page for Stacy's Letter Decor & More). What's nice is that they actually managed to find the same scrapbook paper sheets that I used on some of Riley's wooden blocks! (though it looks like that design didn't make the pic! lol!) Super cute. Thanks gals!

Sunday, June 26, 2011

Build Your Own Blocks


I realize this concept has been done before, but they came out so cute I wanted to share. The stores are filled with generic blocks such as these:


but I wanted to create something different. The traditional block (like the little ones above) are typically 1" hollow squares. I wanted something sturdy for my son to grow into, so I ordered 2.5" blocks that were solid wood from Factory Direct Craft. I gently sanded the corners to round out the edges and spray painted with a neutral color, followed up with a clear coat to protect the paint from nicks.

Each block consists of:
  1. Coordinating scrapbook paper. If you don't already have a stash going, it'll only cost you a few bucks for this project, even if you have more than ten designs like I had.
  2. One side dedicated to a letter in my son's name. I bought enough blocks to spell out his first, middle and last name, so he can start spelling it before he even learns to write. I just ran the scrapbook paper through the printer for this.
  3. Two sides dedicated to either a shiny holographic image or a texture. These are also available in scrapbook paper and they look like so...

     4.  Some of the blocks also got stickers applied to solid color paper. Since some of
          these were also shiny, Riley likes to look at them too. 

A side note if you try this project. I originally tried to apply the paper with Elmer's Spray Glue, thinking that would be the best way to avoid showing any bubbles. However, my little boy was really good at peeling the paper off, so I suggest you stick with something hardier, like Modpodge, to get a really firm stick.

In the end, I got a set of really cute blocks specifically made for my son, in colors and patterns that really grab his attention - which he's proven time and time again by choosing those over the generic ones when they're all on the floor. Definitely worth the investment!

Happy Building!

Tuesday, February 22, 2011

Make this Blossom an Awesome Clock

Every spring the store shelves are flooded with metal garden decorations. Flowers, butterflies, dragonflies, fruits and veggies and picket fences. I set out to find something that would make a funky clock. Note the 'make' in that sentence. I wanted something that no one else had. And I struck gold with this awesome blossom.


It's absolutely perfect with the dome center and 12 petals in the middle. I bought two, one in purple and one in burgandy cause you know I'm going to have to give one away as a gift too!

It took a little cutting and a lot of hammering to get a square time piece into a round dome without damaging the piece (eat your heart out NASA) but the finished product came out great. It's fine now for an adult but if it ends up in a child's room it'll be easy enough to add numbered stickers to the tip of each petal. And with those half price sales at Hobby Lobby, this blossom clock comes in at around $15.


Saturday, February 19, 2011

In Search of a Kid's Storage Center

My son is only 9 months old and I already feel the toys getting out of hand. We have a beautiful wood chest that I filled with his toys but things just seem to get lost in there. I wanted something with separate cubby holes that would allow me to rotate the toys more efficiently. I immediately came across a pictures from Better Homes and Gardens that I fell in love with...


Perfect, right? It's clean, it's colorful....and after some researching, there's a slight possibility it's Pottery Barn but I really think it's by Twenty Gauge. Good feeling gone. This particular unit isn't listed but by looking at some other prices I'm estimating that only one of these 10 drawer shelving units will cost over $1500 and that's just not something I want to pay. Then I found a similar one from Restoration Hardware (baby and child section if you can believe it!). Way to much at $1100, but if I had the money that beauty would be my new storage center in the living room!


And yet another workable piece by Twenty Gauge at $1250.

So here my search begins to find a similar look within my budget. My first, and still favorite idea, would be to acquire an old box storage locker like so:

A 4x4 locker would be great and can be personalized by painting the frame dark chocolate and the doors and inside space different colors. Used lockers are sold everywhere through online websites and in local listings in places like Craigslist. The only problem with buying one outside city limits is the cost to have it shipped, which defeats the purpose of finding a cost-effective storage solution. There were a few locker listings in the surrounding areas, but since I was looking for boxed lockers in particular, I wasn't able to find what I was looking for. Old lockers are great storage solutions for your kids. Lockers are strong and durable and  will grow with your child easily through the teen years and given the style, maybe even their college years. I still intend to keep an open eye for one as the years go by.

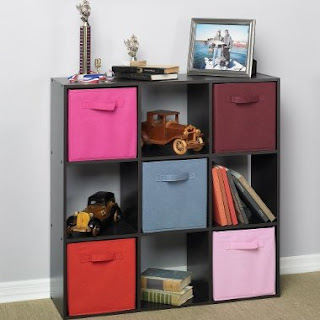
After a lot of websearching, I finally found something that was affordable, and something that I could customize to make it one of a kind. I found it at Target. It's a 9 cube organizer by ClosetMaid with 5 paneled backs and 4 open backs.

I'm not a huge fan of fabric drawers. They bend easily, can't hold a lot of weight and get dirty really easily. Target does carry a better selection than I usually see and they seem a little thicker than usual, but I want something that's going to last a long time. Luckily, ClosetMaid started carrying metal baskets too.  

So I've finally found the perfect storage solution for my son's toy collection. At first, I was going to go with all nickel baskets. But as I was playing with the display on location, I learned that I actually liked mixing it up with the wire baskets. I decided on four of each type, leaving the center cube open for books. To customize, I chose four colors that were already incorporated in my son's bedroom: Vanilla, Baby Blue, Light Mocha and Chocolate. The finished product looks like this:

So finally I have a storage solution that matches the decor and will stand the test of time. In total, I achieved this look for less than $125 so my wallet is happy too. As my son ages and his color scheme changes, all I have to do is invest in some more spray paint to freshen the look. The separation of toys is my favorite feature of this piece. I can divide everything up and rotate different drawers each day to keep him from getting bored with his toys.