Saturday, October 24, 2020

Pretty Pumpkin Potters


Autumn is here and I am ready to embrace the season! Are you? 

For quite some time now, I've wanted to come up with some kind of pumpkin potter. I love the look of succulents on top of bright orange pumpkins, but hate that everything is glued on top with no real chance to grow. I even considered cutting open a real pumpkin to make myself a potter, but unless it's super cold outside, I just don't see it lasting more than a week before deteriorating. So I spent the better part of an hour at my local Hobby Lobby to see what I could put together. With so many colors and materials available, I finally found some Styrofoam-filled pumpkins that looked promising. 

What you'll need:
Styrofoam-filled Pumpkin
Plastic Insert for Soil (I used party cups and party bowls)
Preserved Moss
Hot Glue Gun
Cactus Soil
Mini Succulents


Step 1: Trace the widest end of your insert on top of your pumpkin. Use a knife to gently cut along the line. Unless your insert is deep, you won't need to cut too deeply. Remove the Styrofoam. Use a spoon to shape the Styrofoam until it molds around your insert.


Step 2: Use the hot glue gun to seal the crack between the Styrofoam and insert. This is to keep water from seeping into the Styrofoam and making a hot mess.


Step 3: Continue using the hot glue gun to add moss decoratively over the edge. I've used Reindeer Moss for this project.

Step 4: Add cactus soil and arrange succulents, lightly spritzing the roots before planting.

Lightly spritz your succulents every 1-2 weeks unless needed more often. We have good light in our living room, so our potters stay indoors. I will add that my son has had a succulent in his bedroom for several months now that he hardly remembers to water and rarely opens the blinds for. Surprisingly, it's still alive and actually growing in size.


Sunday, August 26, 2018

Pallet Barn Door w/ Pet Entry


In order to save some much needed space in our guesthouse, I decided a barn door would be the best solution in separating the bathroom dressing area from the hallway. After spending some time looking at images online, I kind of had an idea of what I wanted to create and got to working on a sketch, even guestimating at some of the dimensions.


First thing I did was hit up the local hardware stores. Pretty much all of them will have old pallets available for free, and a few might charge a buck or two for slightly better ones. Since I wanted my piece to be heavy on the "worn" side, I opted for the free. Don't stop at just a few either. I found that only about three or four pieces of wood were actually usable from each pallet. You'll find that a lot of the boards have significant splits in them. And you might accidentally split a few more as you learn to pry them off carefully. 


Once I had enough boards to make the height I desired, I realized I wanted something a bit thicker and sturdier to line with. I hit gold at my local Habitat for Humanity Restore and found some gray boards almost an inch thick. And being pre-loved, I got all the pieces I needed for 50 cents a pop. 


Once I had my design down, it was time to get busy with the saws and nail gun. And yes, I even made this door kitty friendly, as I didn't want our little Elsa to ever be locked out of her cat box. 


I intentionally chose boards of various colors, so I didn't want to risk using a colored stain that could very well make them all look similar. So, I used only a clear matte polyurethane which really made their color and impurities pop. See?


Lastly, I used an industrial pipe and flanges for the outer handle and a simpler grip on the back side. If you choose piping too, I suggest you clean with alcohol, allow to dry, then spray a clear coat or two to keep it from rusting. Attach the barn door hardware and done! Considering this was my first attempt at a barn door and I had no bloody clue how to go about doing it, I have to admit it came out better than expected. A few learning hiccups along the way, but it only added to the 'aged and distressed' look I was going for. And as for the price, your choice of hardware determines the outcome. Barn door hardware can range anywhere from $50 to several hundred bucks. I chose one on the cheaper side and can honestly say it looks good and has held up well. Since my barn door ended up thicker than most, I did have to purchase additional spacers to match and longer bolts to support the weight (which I still need to paint so the silver doesn't show. :D )


Saturday, February 24, 2018

Aged Calendar Framing


Ever come across a print you adore but you're beyond the age of postering walls? I had the most adorable calendar in 2017 that kept me thinking year round, "What could I do with this come January?" Obviously I can't sell anything I make because it's not my own art, but that doesn't mean I can't use if for my own décor! And sure, I could be boring and put it behind glass in a frame, but that's really not my style. Besides, my home has slowly been changing from old world to more of an industrial and distressed wood motif, so it's time I learned to start framing. 

I began this journey by picking out my favorite pieces that'll blend best with the room. 


Step 1: Cut a piece of 1/4" plywood to fit the poster. 


Step 2: Measure, cut and staple the back support onto the plywood. Lightly sand the edges if needed. 


Step 3: Measure, cut and staple the side support. Lightly sand the edges if needed.


Step 4: Glue the poster onto the plywood. I suggest a glue stick (heavy on the edges) because liquids are likely to form pools that leave a bubbling effect. 


Step 5: Fill the staple indentations with wood filler, wipe away the excess, then sand once dry. Stain the wood. Depending on the brand or color, you may want to wipe as you go like I did because the cedar instantly soaked it in.

As much as I loved the bright colors of this piece, I wanted it toned down a bit, so I chose to stain the poster as well. Wipe quickly so you don't oversaturate the paper.

For reference, I used cedar wood on both pieces. For stain, Jacobean on the square; English Chestnut on the rectangle.


For me, this was almost a free project. The calendar was from the previous year, the cedar was left over from a deck project and the stain was just one of many cans in the garage. The saws and staple gun were also previously purchased. The only thing I really had to get was the plywood. 

Sunday, February 11, 2018

Clubhouse Loft Bed


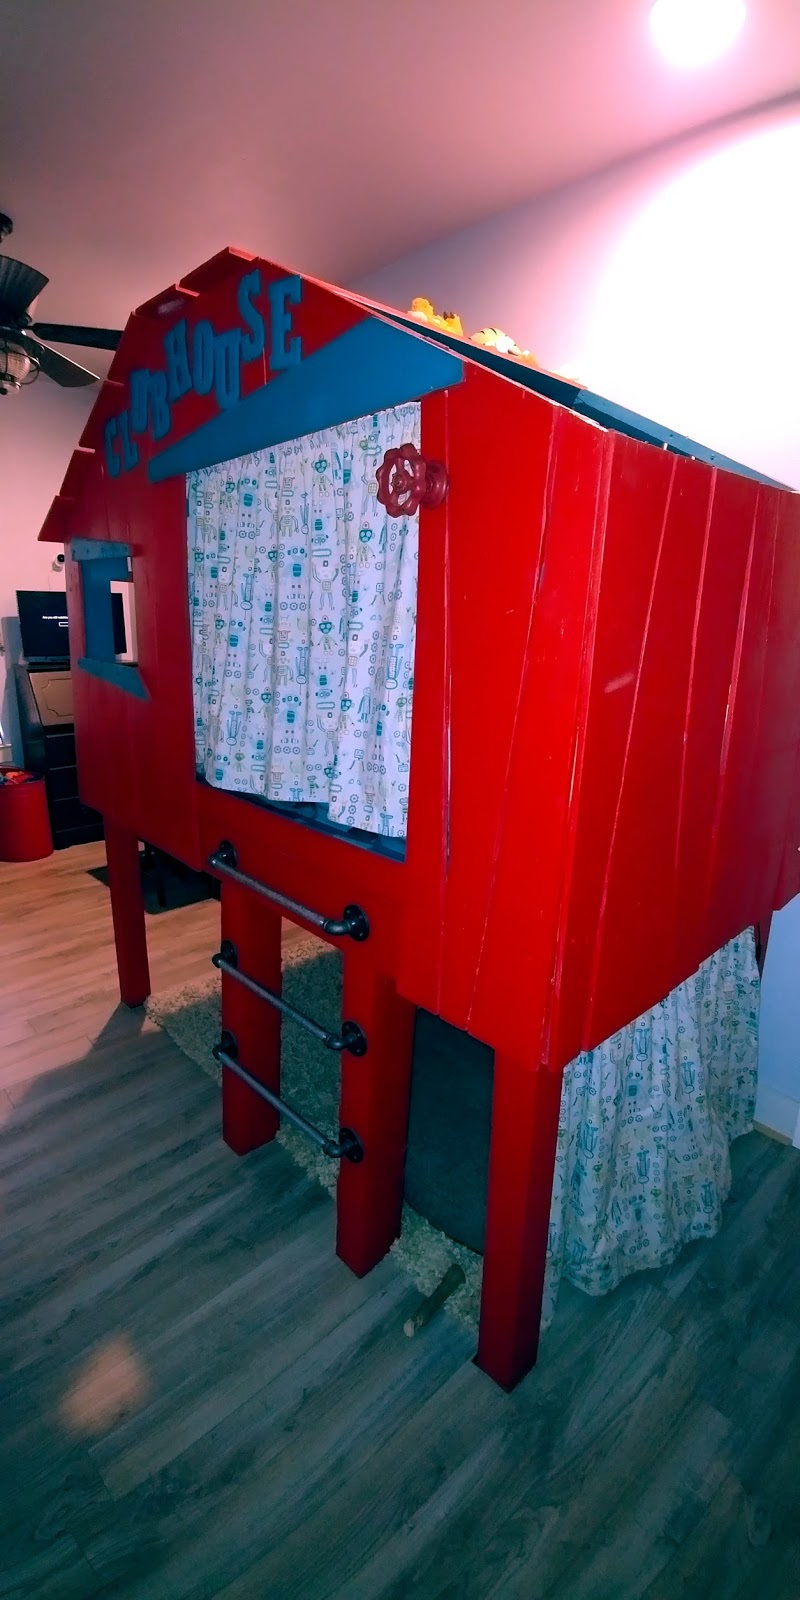
Meet my little boy Riley (might as well, 'cause he'll be present in quite a few of these pics). When it came time to find his first bed, I did a lot of internet searching. Sadly, I wasn't seeing much of anything that popped out as gotta have. Except for one - a clubhouse loft bed. It was boyish, cute, practical and a space-saver. Unfortunately, it had two major negatives. One, it was sold overseas, and two, it was ridiculously priced - as in more than $2300. I love my kid, but seriously? Come on. 

But being me, I decided to put my creativity to good use and build a similar one myself. This was quite a jump for me seeing as how I'd never actually built something before. I've watched a hundred home improvement shows with my mom, how hard could it be? (I'm laughing right now. But really, it wasn't that bad). First thing I did was choose my mattress and use those dimensions to draw up a design. And since I was the one who was going to climb in that thing to change the sheets, I made sure to make the base several inches bigger than the mattress so it wouldn't be such a struggle. The extra space also allows me to tuck his comforter in on all sides. Can't usually get that luxury from a pre-made one, am I right?

With all my dimensions in hand, I went to my local Home Depot and had them cut the framing wood for me. Since I wanted this bed to look irregular, I drew each side out on a large piece of plywood and used a hand saw to cut each individual piece. 

Once I had the design and wood in hand, this project took me the better part of a weekend. It came together surprisingly easy, even though I had to make a few small runs back to Home Depot. Good thing they were close by! And the price tag on this adventure? From wood, hardware, paint supplies, and materials to make privacy curtains, it cost just under $350. And the excitement on my lil' boy's face was perfect!

I'm pretty sure I took some photos of this while I was doing it, but I built it years ago and forgot to post. So who knows where they are by now. Probably on an old phone that froze up. What I can show you is that originally, I used a premade 4-step stair on his bed. I simply turned it upside down to make it more vertical and added the missing wood. 


I also drilled some recessed holes in my posts so that curtains could be pulled for privacy on the bottom. However, I soon found out that weak metal rods and little boys don't go together very well. After he bent two of them, I opted for rebar. Now it's little boy tuff!

And thanks to his PawPaw, some fun, adjustable lighting was added all around the inside. Personally, I get a headache just looking at that pulsing light, but Riley loves it. It also has several light settings so he always has just the right amount of light.


All was perfect in Riley and Gabby world (the puppy who lived beneath the loft). But flash forward a few years, I found myself trying to fit Riley's bed in a much smaller room. Suddenly those stairs that were wonderfully safe for his toddler years were now more of a hindrance, as it left little room for anyone to pass by.

That's all right. I'm always up for a good challenge.

Industrial piping had become very popular these past few years and I'd been wanting to incorporate it within our household. What a perfect opportunity! It ended up being simple enough. Secure two more posts and buy the piping. Took care of the problem in less than a day, but I will say it's the more expensive route. The price of industrial piping has risen with its popularity. This necessary upgrade added about $75. And since I thought it might be a little awkward getting in and out, I added a steampunk water valve so he'd have something to grip on.


And for those of you wondering how the heck I manage to move this beast of a bed around, it's actually quite simple. I designed it to move in pieces. Each side is its own component, as are the roof, base and legs. It takes about an hour or two to break down and put up completely, but it's something I've never had an issue doing despite a couple of moves now. And it's always been Riley's favorite place to hang out. And Gabby's too.


Click to enlarge blueprints.


Thursday, November 14, 2013

Christmas Stocking Wreath


Winter is definitely my favorite season of the year, with Autumn being a close second. I absolutely love seeing all the homes made up for the holidays. In particular, the wreaths. I typically make my own, and if you don't want to shell out an arm and a leg for a beautiful one to adorn your door, I suggest you pick up this talent as well. As I was scanning Etsy for some inspiration, a marked a few I really liked:
 

Yep. See the stocking on the far right? That's where I realized they made moss stockings. Unfortunately, that particular wreath wasn't to my taste and it had a price tag of over $100. In fact, most of the wreaths I came across had a pretty hefty price tag, and that didn't even include the price of shipping.

I picked up the moss wreath on ebay for a mere $10 with free shipping and hit up those lovely 50% off sales at my local Hobby Lobby for the rest, so all together my Christmas Stocking Wreath only cost me about half an hour of my time and $40 to make. Note: You will have to reshape your door hook to accommodate this type of wreath and I suggest you use wire to securely attach it to the hook. Thieves tend to swipe beautiful wreaths because they can fetch a nice price tag, so if someone's gonna steal yours, make sure they have to stand at your door for a bit and work really hard to get it! Usually, they'll move on if it's not a quick grab-n-go.


HAPPY DESIGNING!!!


Sunday, January 13, 2013

Cheap & Easy Bedroom Ideas

So I've got an extra bedroom to deal with in this house, but I didn't want to go out and spend a bunch of money to fix it up. Have this problem too? Start digging around your home, your friends' homes, even flea markets or your local Goodwill stores. And don't be shy about it. You'd be surprised what jewels you could come up with. So what was I lacking to tackle this bedroom?
 
 
NO HEADBOARD. I had a bed, I had linens, but alas, no headboard. I don't know about you, but shoving the bed against the wall just feels boring and impersonal, even if I do have really pretty linens. So I decided to let some wall art become my "headboard". I live in the south, so I'm lucky enough to have a Hobby Lobby around every corner like Starbucks. And if it ain't on sale this week, you're pretty much guaranteed it'll be 50% off next week. I found some metal stars with coordinating colors and hung them in an arc fashion, and made sure they were secured to the wall well and just high enough not to bother the people that had to actually sleep in the bed.


NO SIDE TABLE. I got lucky and saw that my sister had some pots in her backyard that she wasn't using. And OMG they were the perfect color for my bedroom! Instead of using them for floral decoration, I propped them up, filled the inside with some greenery I already had in the house and placed a glass top over it. I even snagged an eclectic range of books off the family bookshelves and an ornate bird ornament to hang off the lamp. Love this!


NO DRESSER / TV STAND. I had a TV but nowhere to put it. I found a really old chest of drawers at my Goodwill Store and got it for thirty bucks. It needed a little love and a major new look but at least it was solid wood. It had recessed grooves in it for design and some older hardward holes which I filled with wood filler. I wanted this piece to look a little rough, so I added a little spackle to the drawer tops and the edging on top to make it bumpy. Then I found a plastic stencil that I liked and used it with spackle to create the design that you see now. Whip out some paint and wipe on some antiquing solution. Cute piece. (Spackle design not recommended for younger kids as it's more sensitive to damage).


Voila! Simple ideas that make really cute additions. And just like my potted side table, don't think for one second you have to use something for the purpose they were created!


Thursday, December 1, 2011

Rockin' Surfboard Night Light

So I wanted to get a night light for my little boy's room and I just didn't like anything I was seeing at the store. Last Christmas I went to a neighborhood block party where one of the homes staked liquor bottles full of lights along the sidewalk pathway. Very cool...and hey - recycling! See?....


And it made me think how cute a bottle of lights of would be as a night light. So I soaked and scraped the label off a vodka bottle and went in search of a wine rocker. There are a ton out there but the one I really liked was a curvy one I found on Etsy. Slap on a little paint, some embossed and foiled stickers, and a little triple thick gloss to seal the paint and stickers. Add a dimmer to your lights so you can use just the right amount of glow in your little one's room. (I was gonna glue a few wood circles to the rocker and make this night light a skateboard, but daddy's a surfer and pushed for a surfboard. LOL. But the skateboard was gonna be totally cute!!!)